
Mounting a scope or optic is a lot easier than you think. The other side of that is, it is also as easy to screw it up and or damage your scope or your weapon if you don’t take your time and pay attention to detail. Mounting an optic generally requires 3 components, a mounting point, scope rings and the optic itself. Let’s start from the gun up.
Mounting Options
Most rifles will have 1 or 3 options and they can vary by make and model. Many hunting or sporting rifles will have “tapped” holes. What this means is there are already pre-drilled holes in the receiver or barrel to accommodate either scope rings, mount or a rail. There are also Weaver and Picatinny rails (MIL-STD-1913) which provide a universal platform for many different types of mounts and optics as well as other accessories.
Rings
At the end of the day, pick the best rings for you, your budget and your optic. To help determine what’s best for you, here are some things you want to keep in mind when putting glass on a rifle. First, you want to mount the scope as close to the barrel as possible while maintaining a good cheek weld and a comfortable and full eye relief. Some brief explanations:
Eye relief is simply the distance between your eye and the lens of the scope you look through to obtain a full and clear picture of the target and crosshairs. If your too far away, you will get a black circle or “fog” around what you are trying to look at, then you start chasing your head and eye around the reticle trying to get a good sight picture, breaking your cheek weld and screwing up many chances you had at placing an accurate shot.
Cheek Weld is your cherub cheek putting a smother on your butt stock whilst holding the rifle in a such a manner as to fire it. When you are holding the rifle, looking down the sights and holding the rifle to your shoulder, your cheek should be suction cupped to the butt stock.
Meanwhile… back before we went off on a tangent. Rings. Select rings that have as few points of failure as possible. Excessive screws, pieces that screw together, bases that have multiple pieces before you even get to the scope rings themselves. You want to have a solid, low center base. You want to attach to the rail or mount points and secure the scope with even dispersion of pressure.
Mounting
For the most part, the optic itself is going to decide for you where you will be mounting the rings. Both on the rail or mount itself as well as on the actual optic itself. Once your optic determines the best place for you to tighten it down, SNUG it down DO NOT tighten yet. We have some more adjustments to make.
Place your optic in the rings and fully attach the rings, but again, DO NOT TIGHTEN! It actually helps to leave play for right now to help set our proper eye relief. With the rings attached, scope in place and nothing flopping around, what we are going to do is hold the rifle, get a good cheek weld and look through your optic. is the lens full of the target? Is it hazy and dark around the edges? Do you feel like you are looking through a smaller peephole than the size of your lens? This is why we did not tighten it down. You can slide the scope back and forward until your eye relief is perfect for you. If you need more/less than the optic will allow you, time to re-examine where the base is mounted and move it back or forward accordingly. Snug one of the rings down to hold your set eye relief in place and we are ready to move on.
Securing
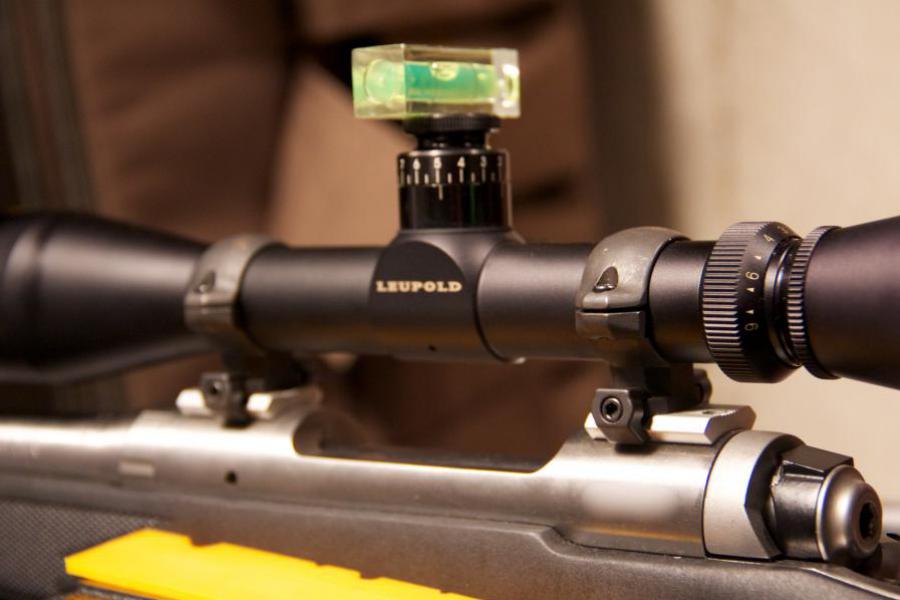
You are going to want to do the optic first. Don’t go pulling every screw out, otherwise you are going to have to do your eye relief all over again. For best results use either a vise or stand that allows you to level and firmly hold your rifle in place. You will also need some Blue Loctite and a SMALL level similar to what we have pictured here.
The rifle fore and aft (butt to muzzle) does not have to be perfectly level for you to get this right, but as close as you can eyeball is best. The reason for this is your mounts are set, they can only go in and tighten down one way. The scope is also all set front to back since again, the rings will only allow you to go a certain way. The CROSSHAIRS however, need to be level. So we place our level on the elevation turret (the top one on most optics) and get the little bubble squared away. Once all is level, the eye relief is good to go and you like where everything is placed…we can begin tightening up all the screws.
Tighten
Blue Loctite is your friend, but keep in mind you DO NOT need copious amounts of it. After shaking, a drop or two on clean threads is all you need. Start with the Scope ring you did NOT snug down to hold eye relief and level in place. You don’t need superhuman strength, just get them one past snug until you get all of ring screws all done up. Think about changing a tire and lug nuts, you cant tighten one all the way down and then move onto the next. You have to spread the pressure around evenly to properly seat the optic as well as reduce risk of pinching the tube on your pretty scope.
Once one is done, you can now do the other. Once they are both done, tighten them all up equally so that nothing budges. From there, you can probably handle the Loctite and screws or disconnects on your rail system or however your rings attach to the rifle since those are only going to go in one way.
This is a really long read, but properly mounting your optics will allow you to focus more on making your rifle the precision piece of hardware it was meant to be. By doing it right you can focus more on your rifle’s Zero, trigger pull and breathing as opposed to constantly fixing loose bolts and re-zeroing and troubleshooting all the things that that affect a good, accurate shot. If your equipment is to blame, your preparation is to blame. Simple as that. Create a setup where the equipment is solid and only you are to blame for inaccuracy. Then, PRACTICE! You get better at ANYTHING with practice!
I hope this was informative and helpful, be sure to check your chambers and be safe!
Comments
gah8s